How to make a neka?
Browse the Neka homepage, scroll down to find a favorite work, and click on it.
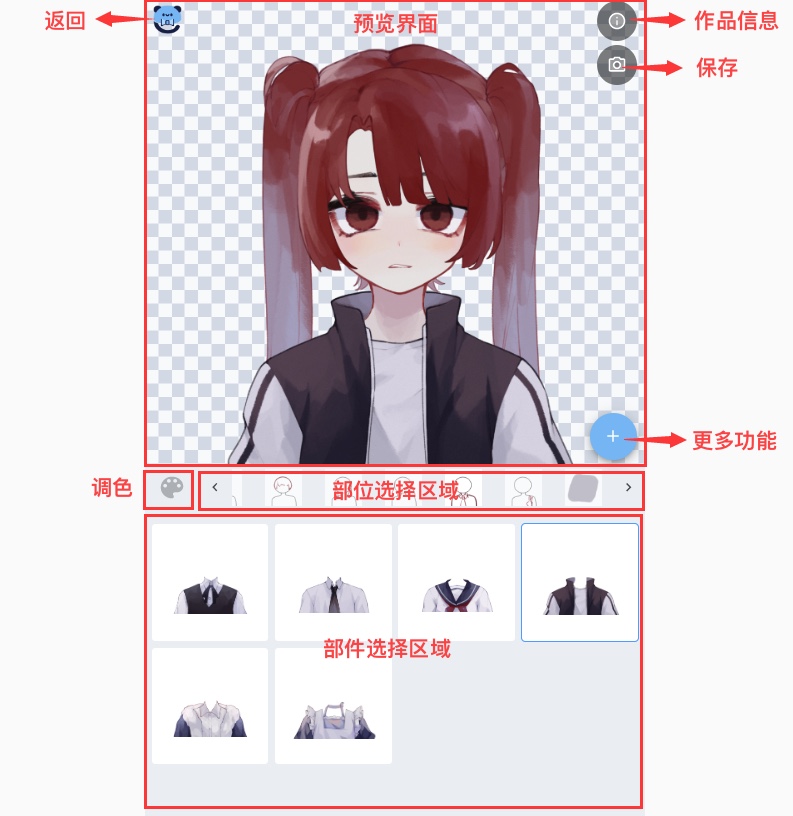
The following interface shows up after you click on a work:

The top half of the page shows the preview of your current work, and the bottom half of the page is the operation area.
Please pay attention to the introduction to the work
When you first click on a work, a brief introduction will be displayed.
Usually, the author will add the application scope of the work in the introduction, please make sure to read and comply with the content.
What if I forget the introduction?
Click on the exclamation mark icon in the upper right corner of the customization work to see the introduction again!
How to change widgets?
Select the widget you want to replace in this part in the "widget selection area" at the bottom of the Neka page, and the widget will be replaced in the preview area.
Swipe the widget selection area left and right or click the small icon above to switch parts, and then you can replace the widgets of other parts.
How to save the completed Neka image?
When the work is to your satisfaction, you are done! Save it!
Click on the camera icon in the upper right corner to quickly generate the image you created. Save the image with a right mouse click or long press.
For an HD image, click “generate HD image” below and wait for it to be generated, and then save it.
Tips:The speed of DH image generation may be slower in case of the peak access period.
What is the difference between an HD image and a quickly generated image?
If the author used a larger canvas to create the Neka, then the HD image will take up more memory space than the quickly generated image.
But when the author used a smaller canvas, the difference is not much.
The quickly generated image is generated faster than the HD image.
After the HD image is generated, a trace is recorded and you can see the Neka you have generated on the timeline. You can use them to set the avatar of your Neka account and to post traces.
Colering
当左边的调色盘亮起的时候,就说明这个作品的作者给这个部位设置了调色功能。 When the colering icon on the left lights up, it means that the author of this work has set the colering function for this part.

After selecting a widget, click on the palette to bring up the colering function. Click on your favorite color scheme set by the author.
There may be different areas in one part to be toned in some works. Click on the small icon inside the palette to switch the colering object, and you can tone other areas set by the author.
In most of the works, you will find that when switching colors, the colors of other parts changed along with it. This is because the author has set up interrelated colering.
If you need to tone this part without changing the colors of other parts, click the link icon in the upper right corner of the palette, and when the link icon suggests you the interrelation is canceled, you can tone it separately. Then the parts that would have been changed together will remain the same when you tone some parts.

More function
Click the plus icon on the right side of the Neka page to find more functions.

Random
What is Random? How to randomize?
The Random function is to choose randomly among all the widgets to create an image.
Click the plus icon in the bottom right corner of the work to expand the function bar. Click the dice icon, and then you can use the Random function.
Why are there notices in some works saying not to randomize?
Because circumstances that the author doesn’t like usually occur like parts missing, parts overlapping, etc. in randomly combined images. So some authors propose not to use the Random function and hope you match widgets yourself.
Revoke/Redo
What if you accidentally clicked on the wrong one and don't want to redo it?
Click the plus icon to expand the function bar.
Click the arrow to the left to undo your previous action. The regret pill!
What if you feel the last step seems to be good after the revocation? Click the arrow to the right to redo this step. The regret pill fails!
If the arrows are gray, there are no current steps to revoke/redo.
Unload non-essential parts with one click
Want to redo them all, but it's too much trouble to click them off one by one? Try the all-unloading button!
Click on the plus icon to expand the function bar, and click on the all-unloading button to unload all non-essential parts.