Quick Start
General process of making a Neka template
Draw the material on PS/SAI/procreate or other drawing software (be careful to layer each part).
Export the PNG image material (generally each part is a picture, you can refer to the sample material package in discord painters group), make sure that the size of each material is the same, the same size as the canvas, do not appear cropped.
Upload the material to the editor, debug and submit it .
Tip 1: This process varies from person to person, you can draw the plain body and a few accessories first, export and upload to the editor for debugging, you don't have to wait until all the parts are drawn and then upload.
Tip 2: If you have no experience in making pin-ups, you can get guidance from other painters and developers in Discord.
Tip 3: Pinch click editor supports smart color change, if you want your accessories to have multiple colors, you can learn about the color change function first, if the smart color change can meet the demand, then you don't need to export and upload multiple color change materials manually.
How to create your first Neka work
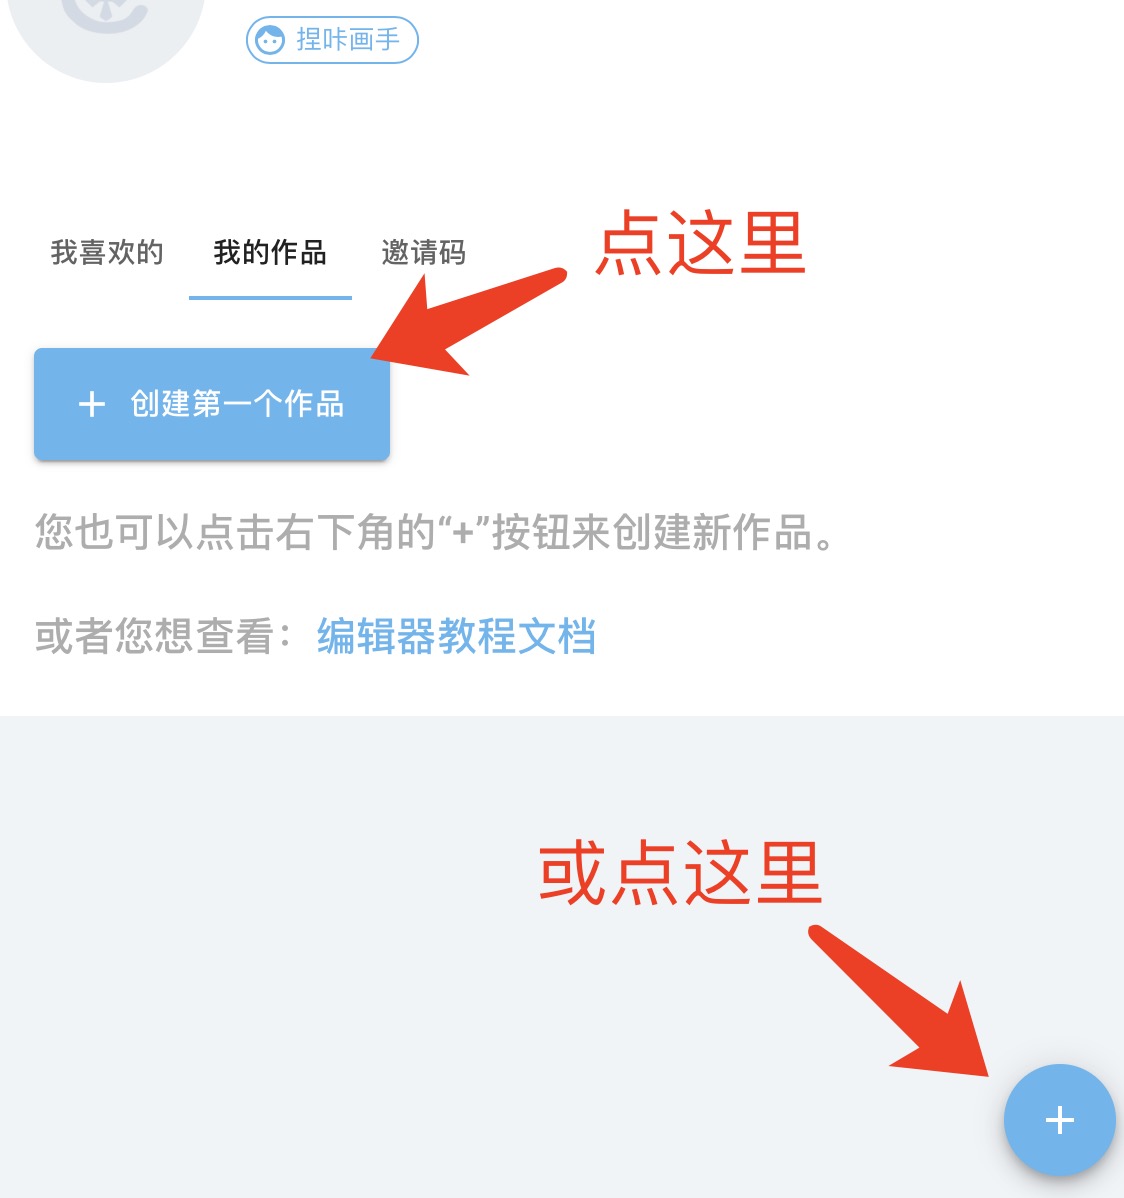
Go to Neka workshop (personal background), click "Create first work", or click the "+" button at the bottom right corner to create a new work:
One Image Editor's Guide
Text Version Editor Tutorial
Written in front: This document describes how to edit and publish your pinups in Pinch Click. This document is text-based, see above for a concise version.
The text description may not describe the function very well, why not actually click in the editor and try it out!
Even if you do something wrong, you can find the Undo and Redo buttons at the top center of the editor.
The editor has the function of auto-save for a period of time, but don't forget to save your work by clicking Save in the upper right corner when you need it.
Create work
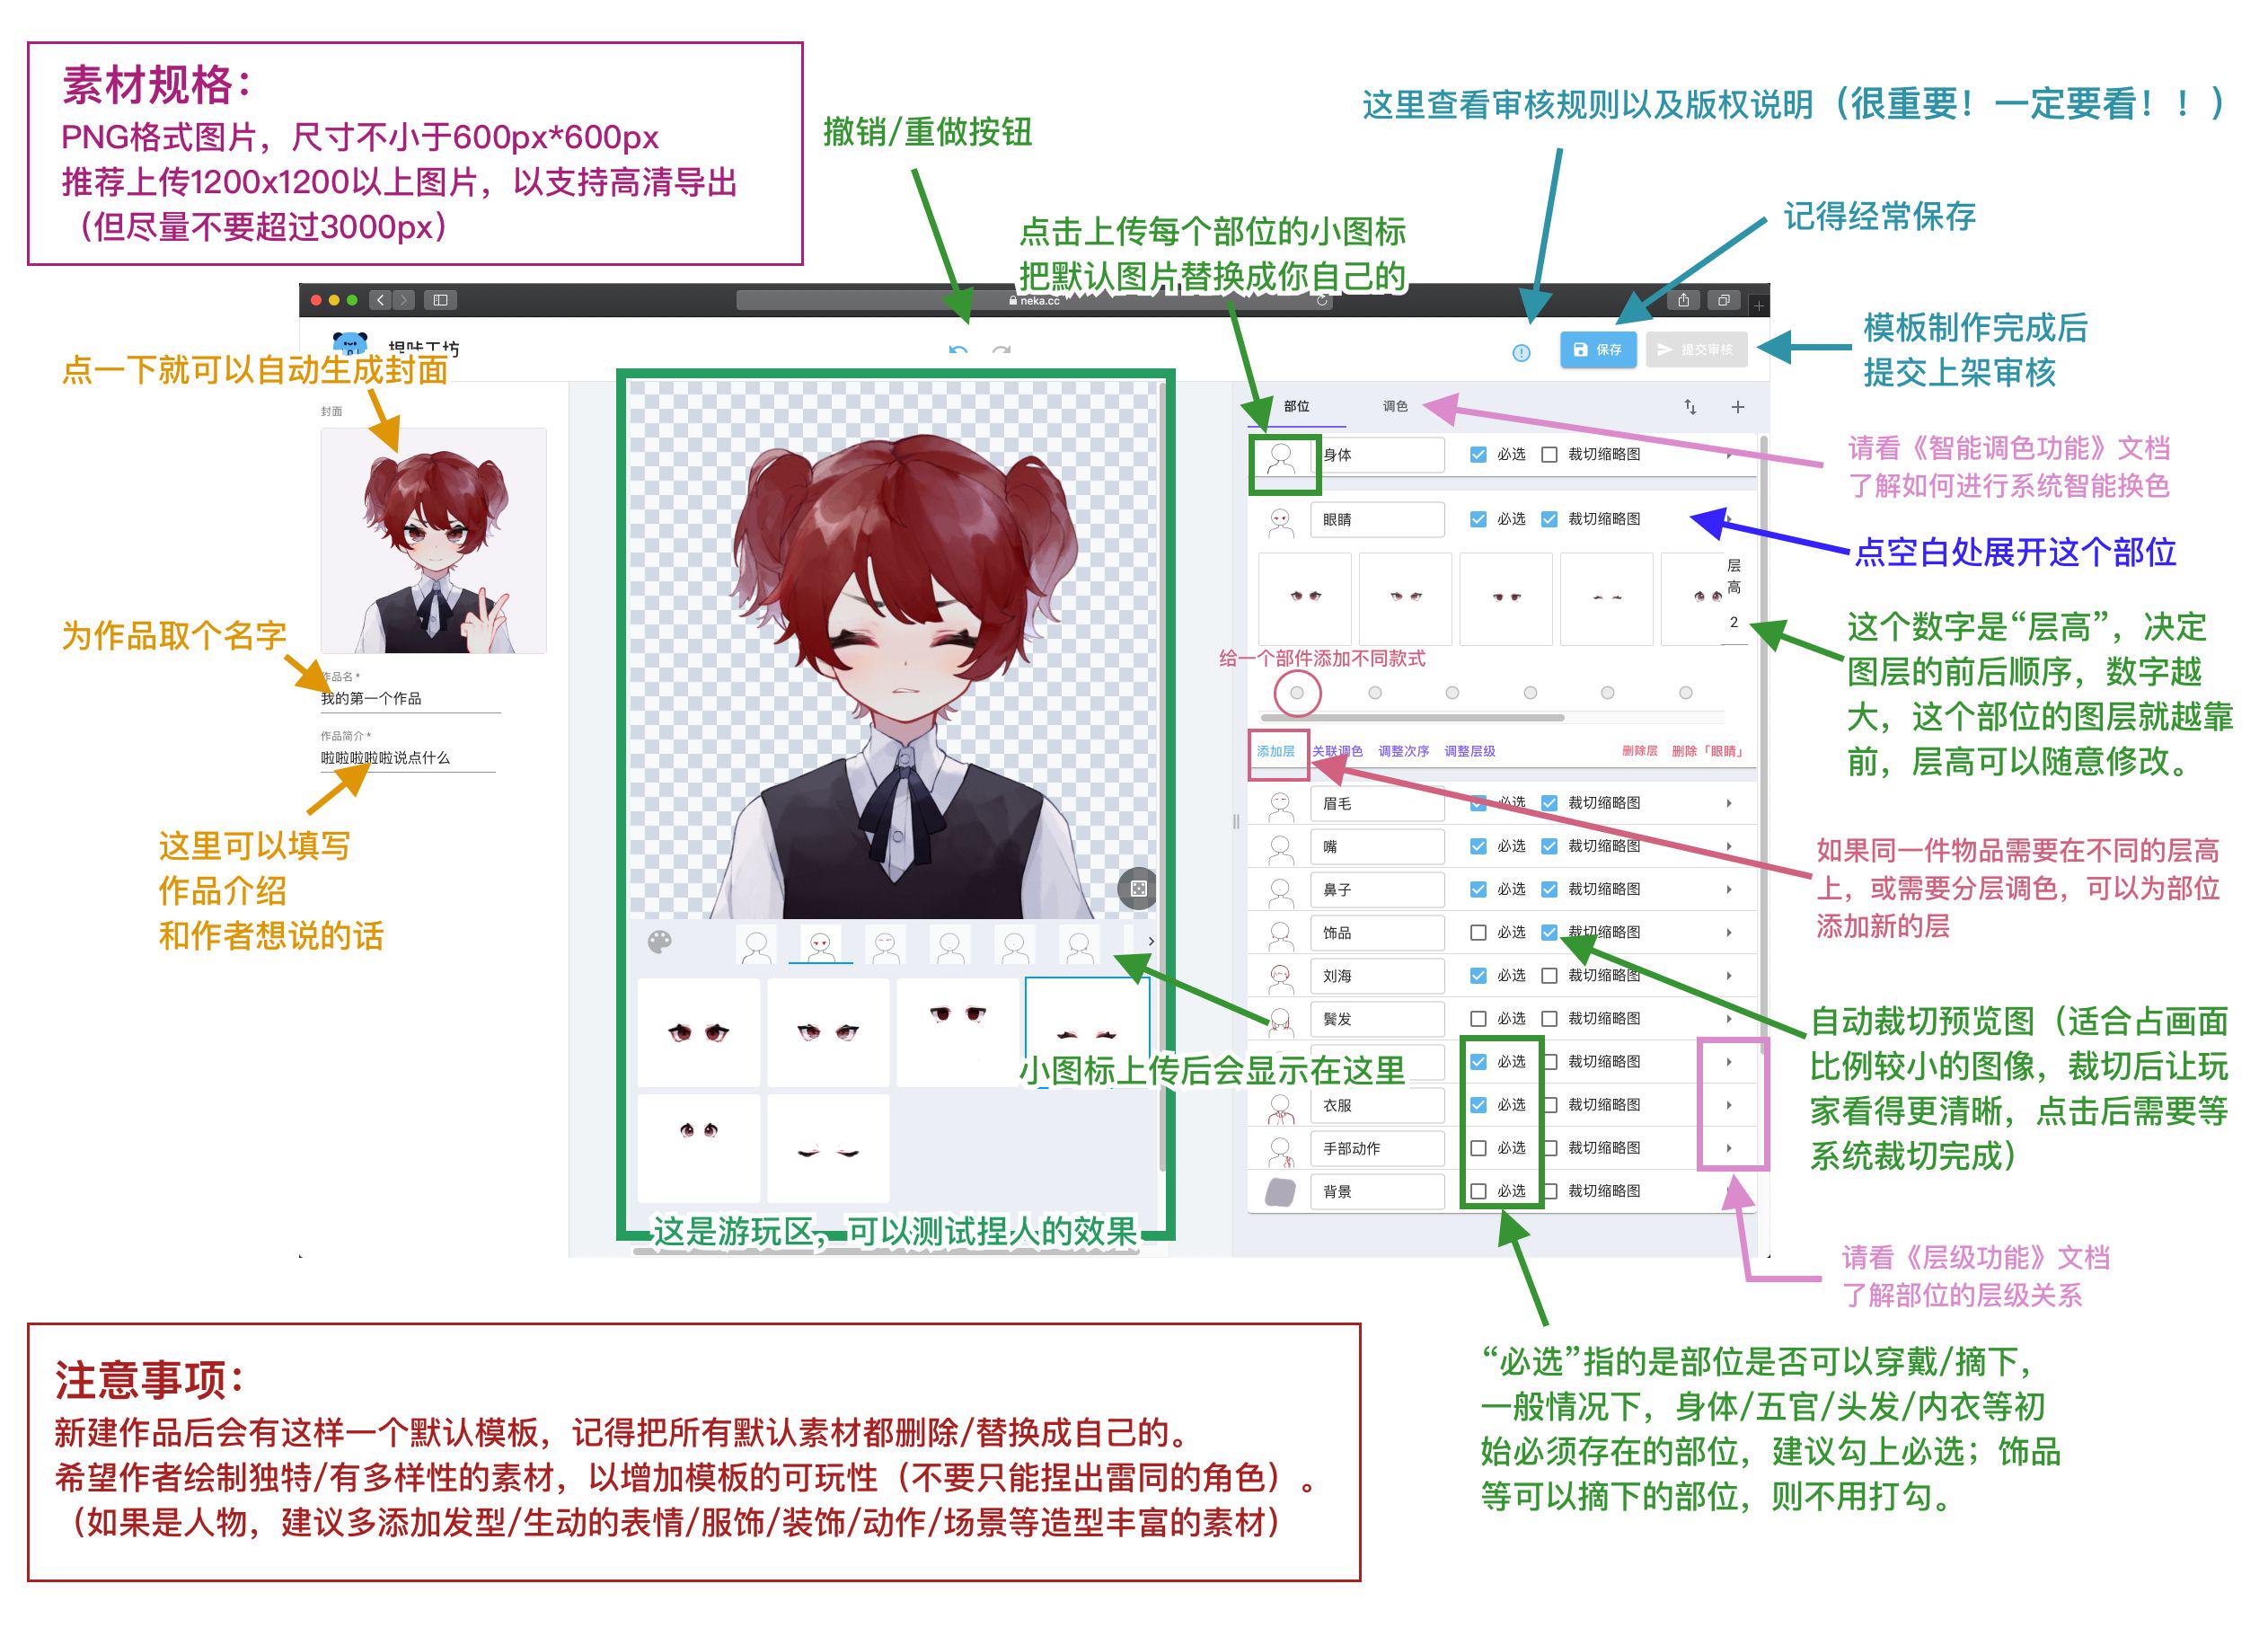
Click on the avatar logo in the upper right corner, select Kneadworks to go to your personal backend, and under the My Works option, click on the plus sign in the lower right corner to create a work. After creating a new one, you will see an editor with the official initial artwork.
The initial work is for reference to the use of the editor. Please do not keep any material from the initial work (including small icons) when submitting your work.
Not good at editor-slacker production (not recommended)
In the case that your pin-up parts are classified in the same way as the initial artwork, or you draw the parts according to the initial artwork at the time of drawing.
You can replace the official material with your own material to quickly and easily complete the production of pin-ups.
But often you will need more categories of parts and more effects, so read on to learn how to use the editor.
Part
Basic operation of the part
Each column on the right side of the interface corresponds to each part of your body, i.e., the place where the play area selects the broad category.
Expanded partsClick on the expanded part to expand it, allowing you to perform more operations on the part.Delete / Create newClick Delete「Part Name」in the lower right corner to delete the part; click the plus sign in the upper right corner of the entire edit field to create a new blank part.Upload/replace small iconsUpload your part's small icon on the far left of the individual part bar, and this small icon will be displayed in the tour's selection of broad categories.Please try to upload pictures that can clearly describe what your part is, so that players can quickly find out where the part they need is when they use.
Named partsName your part in the text box to the right of the small icon. The named name will not be shown in the play area, so feel free to use the part name that you find more convenient and recognizable.Clear part naming can provide a lot of convenience when you make more complex works with more parts.
Set part properties/function
Click the vertical ellipsis to the right of the expanded part to set the properties of this part.
RequiredChecking mandatory enables you to make this part a mandatory part, i.e. a part that cannot be unchecked and from which an option must be selected. When unchecked, this part is allowed not to have any of the options selected.Crop thumbnailChecking the crop thumbnail will allow you to crop out the transparent parts around this part when it is displayed in the play area, so that it can be displayed more clearly and visually to the player.Cropping thumbnails does not crop your original material, it only makes it easier to display, so please feel free to check the box.
Move/Rotate/MagnifyThe current move function only supports unlimited movement. If you want the widget to be able to move, rotate or zoom in, just click expand on the left side of the corresponding function and select unlimited.Levels
Click on the triangle on the far right to access the layers below this part, see the introduction to the layer functions for details.
Adjusting the order of parts
On the left side of the new part, there is a button to adjust the order of the parts by clicking and dragging.
The order of the parts will determine the order of Neka parts in the play area.
Tips:The order of parts is an important part of the Neka play experience! It is recommended to set the main parts in a more forward position and put the relevant parts together.
The order of the parts is independent of the layer height, which depends on the layer height.
Tips:When using dragging on mobile devices, it may be more difficult, we recommend narrowing your browser to the point where you can't move left or right and then try dragging.
Part/widgets
Upload/delete/preview widgets
Expand the part of the clip you need to upload and click Upload to upload your clip.
Tips: When uploading, you can select multiple clips at once for bulk upload.
Move your mouse over the widget (tap the widget with your mobile device) and click the "X" in the upper right corner of the widget to delete it; click the eye icon that appears in the center to preview the effect of the widget when it is selected in the play area.
Layer
Each horizontal row of parts is called a layer. Click Add Layer in the bottom left corner of the part to add a layer, and on the far right side of the layer to make more settings for this layer.
For a detailed explanation of the layer function, please slide down to the introduction of the layer function.
Layer height
Enter a number to the far right of the layer to set the layer height for this layer of parts. The layer height determines the height of the parts, the larger the number, the more forward the material is.
The layer height is like the layer height in drawing software.
Tips:Level height is allowed to be set as negative number, but decimal is not supported
Tips: You can use whole tens or hundreds of numbers at the beginning to set the layer height for subsequent new parts that you want to intersperse.
Don't forget to set the layer height properly, and please try not to use the same layer height for different layers.
Associated Color Mixing
You can use the associated color palette below the part to set the palette for the entire part, or you can use the associated color palette inside the ellipses to the right of the layer to set the palette for a layer of parts.
For specific color mixing functions, please see《Color mixing function》。
Adjusting the order of parts
Adjust the order of the parts in your part by clicking on the Adjust Order at the bottom of the part.
Tips:Similarly, when using dragging on mobile devices, it may be more difficult. It is recommended to narrow the browser to the point where you cannot move left or right and then try dragging.
Adjustment Levels
Click on the Adjustment Level below within the part to change the position of the level for the entire part.
For more information about the hierarchy function please see《Hierarchy Function》。
Copy
Click Copy at the bottom inside the part to duplicate the entire part.
The copied part copy will be at the far end of the current hierarchy.
Tips:Don't forget to make changes to the copy's small icon, name and layer height if needed.
Layer
In parts, each horizontal row of parts is called a layer. Using the layer function enables you to have different layer heights for individual parts in the play area, perform local color mixing, and other richer effects.
Basic operation of layers
Adding layersClick Add Layer in the bottom left corner of the expanded part to get a new layer.Delete layerAfter clicking on the delete layer in the bottom right corner of the part, the location originally used to fill in the layer height will become a trash can icon, click on it to delete the layer.After deleting, click on the delete layer again to end your operation.
Layer heightEach floor has its own independent floor height and needs to be set separately.This feature can be used when you need a part to have a different layer height.
Associated color mixing (layers)
On the right side of the layer, click the ellipsis above the layer height to expand it, click Associate Palette, and select the swatches you need to associate with it.
It will only work on the layer you are bound to, not on the other layers within this part.
When you need to individually color a part of a widget, why not try layering the part and uploading it and then binding the color palette to that layer?
Binding parts
When a layer uses bound parts, the display of this layer material will depend on the bound parts.
When no part of the bound part is selected during play, then this layer will not be displayed either.
This layer is only displayed properly when there are parts in the bound part that are selected.
Mixed color mode
You can set this layer toMixed color mode,This will change the blending effect of this layer of material.
Note: Currently, the blending mode and move function are not supported at the same time. If blending and move are set at the same time, it may lead to some errors.
Advanced Guide
Perhaps you would also like to learn.
How to export and upload clips on iPad
↑ Click on the appropriate link to view the specific tutorial.